


Showing posts with label Tips N Tricks. Show all posts
Showing posts with label Tips N Tricks. Show all posts
Monday, 1 June 2015

Do you own an Apple devices? If yes, then this article will be really fruitful for you. As we know, without Apple ID, you cannot donwload apps from appstore. Creating Apple ID is compulsory for you to fully enjoy for iOS device.
If you had attempted to make Apple ID earlier then you might have been asked to enter your credit card details. I'm sure not all of us have Visa Card. However, making apple is a lot more easier without using your credit card details but you have to follow certain steps as mentioned below.
Process:
Step 1: Open iTunes and go to Appstore.

Step 2: Select any free app to download(not Paid).
Step 3: Click on Get.

A dialog box will appear. Since, you don't have Apple ID, you cannot login so you have to create one.

Step 4: Click on Create Apple ID.
Step 5: Now, a new link will appear as shown below. Click on Continue.

Step 6: Read the License Agreement and Agree the terms to proceed ahead.

Step 7: Fill up the necessary details and click on Continue.

You will directed to the payment info. Most of us get strucked here.
Did you noticed the NONE. This option is only since you tried to download free app. If you had created directly then you won't get this NONE option.
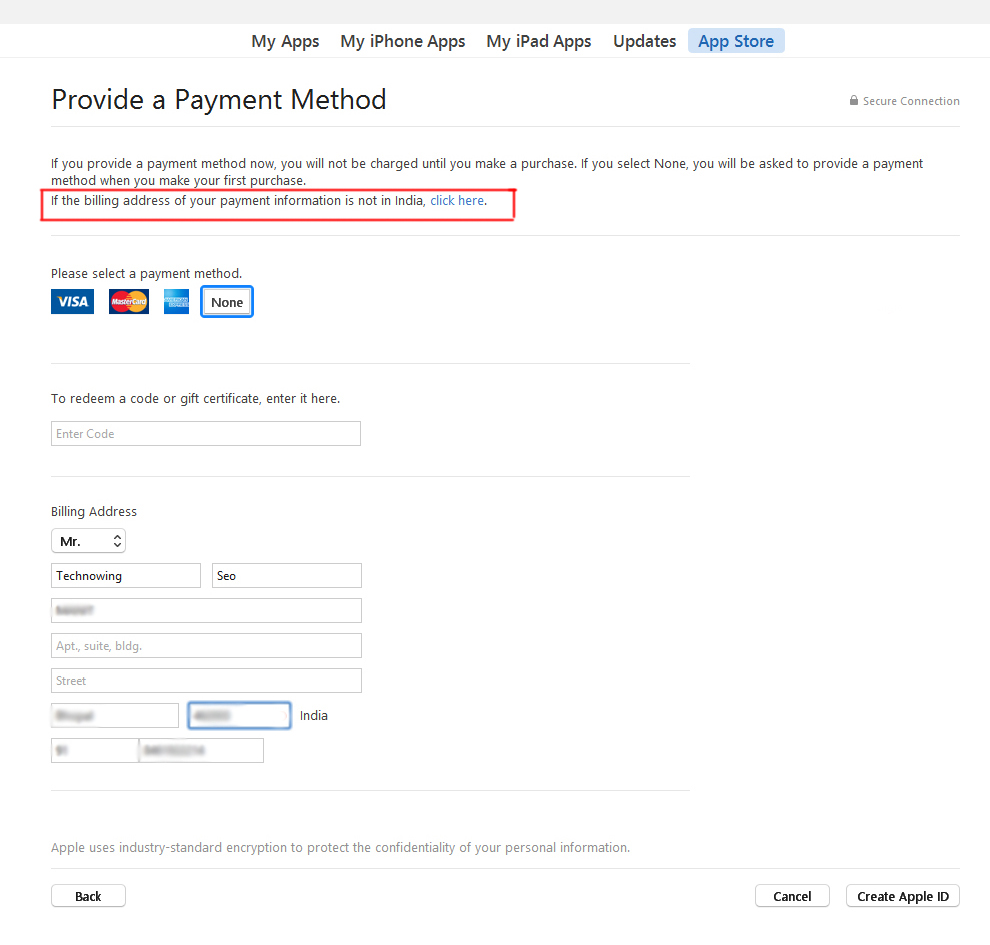
Step 8: Fill up the necessary details. Don't worry it won't ask you to enter your credit card details. Finally click on Continue.
Remember, you can also change your country.
Step 9: Go to your inbox and validate your email address.

This is the most easiest way to create free Apple ID. I did this in iTunes but you can also do this from your phone directly. Always remember to start the process by trying to download Free App from Appstore.
If you got any problems, please let us know through comments. We are always there to help you.
Wednesday, 11 February 2015

By default, the Administrator account is disabled in Windows 7 and Windows 8. Though the account you create during the setup, possess administrative rights, yet it might be necessary sometimes to perform tasks with Administrator account. There's actually no need to enable administrator account since you can execte programs that need administrative priviledges by simply right click and selecting Run as Administrator. For educational purpose it's better to learn how you can easily enable and disable Administrator account.
Process to Enable Administrator Account
Step 1: Search for Command Prompt in Start Menu. When you find it, Right click on it and select Run as Administrator.

Step 2: Type the following command and press enter.
net user administrator /active:yes

It is important that you run command prompt as administrator else you will get error as shown below:

Now you can sign out and check. You will see your Administrator account enabled.
Process to Disable Administrator Account
Step 1: Search for Command Prompt in Start Menu. When you find it, Right click on it and select Run as Administrator.
Step 2: Type the following command and press enter.
net user administrator /active:no

Hope this will be useful for you. If you have any queries please let me know.
Sunday, 1 February 2015
 Disk partitioning means the act of dividing your hard drive into multiple volumes. By doing so, you can create as many partitions as per your requirements. You can partition your drive using various 3rd party software. However, in this article I will teach you how you can effectively partition your hard drive without any software.
You don't need any advance skills. You can do it by following few easy steps mentioned below.
Process of Disk Partition
Step 1: Right Click on 'My Computer' icon and Select 'Manage' as shown below.

Step 2: Click on 'Disk Management' located at the bottom.

OR
You can also directly open Disk Management with Shortcut command.
Step 1: Open Run ( Win key + R) and
Step 2: Type 'diskmgmt.msc' and press Enter.

Step 3: Now select the volume you want to partition. I am partitioning my F: drive. Right click on it and select Shrink.

Step 4: Now enter the amount of space to shrink in MB and click on Shrink. For example: 50 Gb = 50000MB

You can see in the image below, you can see that 96 GB F: drive space has been reduced to aprrox 50GB (highlighted in Red) and the remaining space can still be used to create another partition or extend other drive space.

Process for extending your Drive
Step 1: Right click on the drive you can to extend and select 'Extend'.

Step 2: Enter the amount of space in MB that you want to extend and click on Next. You're done.

I extended my F: drive. You can see below.
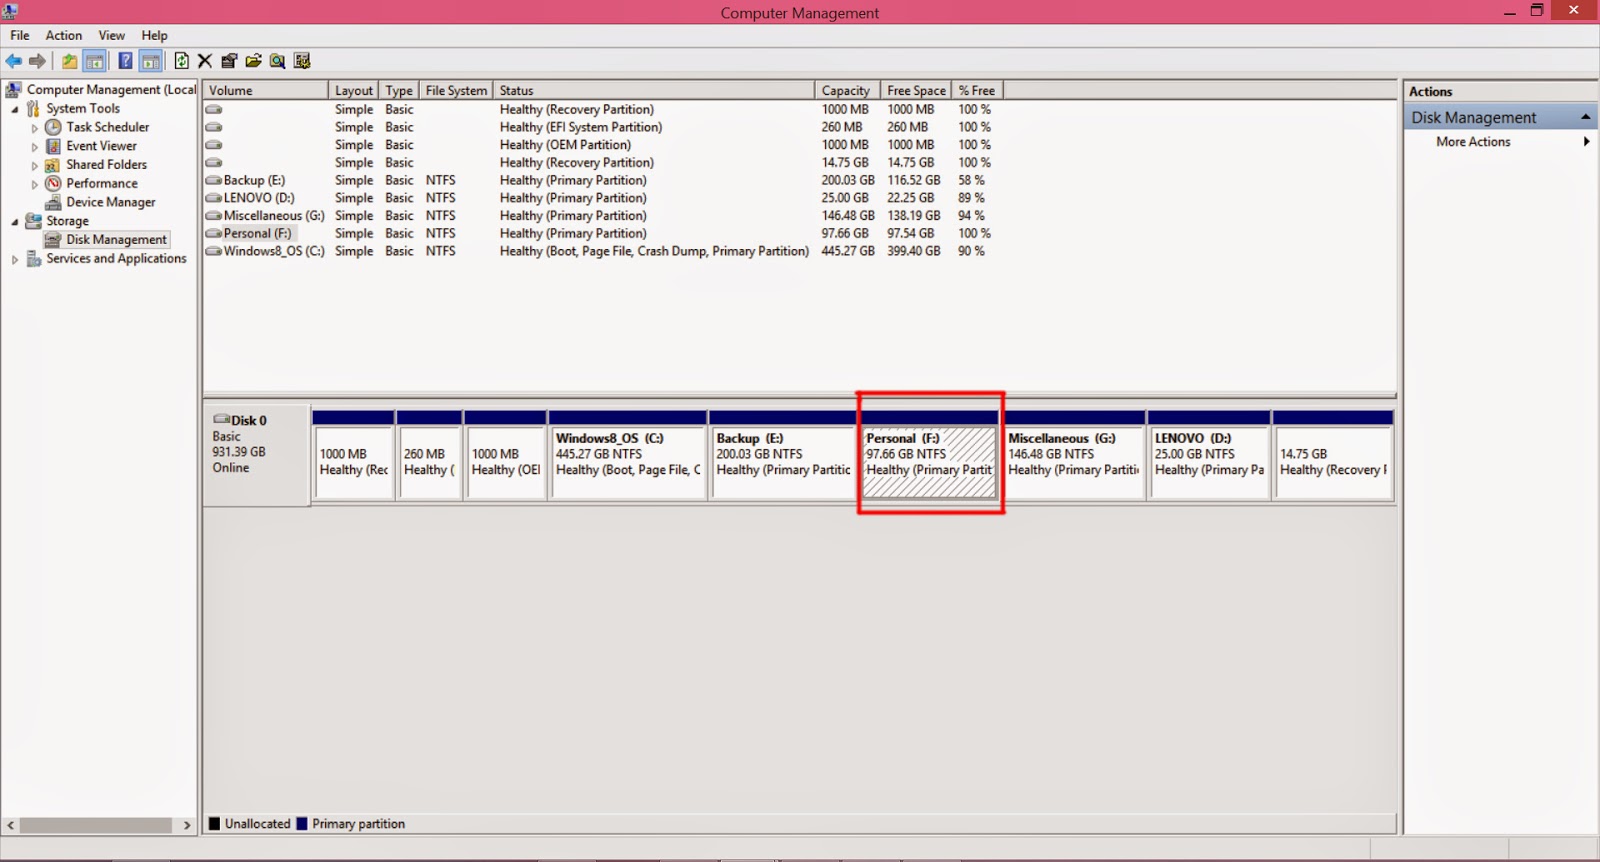
Conclusion: I performed the disk partition in Windows 8.1. You can follow the same procedures in previous version of Windows. The best thing is that you can create new partition even from drive with files and extend them in Windows 8.1 which was not possible in Window 7 and Window XP without using any software.
If you have any queries then comment below. I will be always there to solve your issues.
Saturday, 20 December 2014

Smartphones are really cheap these days. Many of us own android phones. Some of you might own more than one smartphones. To manage your smartphones, there is official software from the manufacturer company. For example, using Nokia PC suite you can manage your Windows phones, using Samsung Kies you can adjust the settings of your samsung device and using iTunes your can easily backup, restore your settings of your iOS device. There is one limitation of these software i.e you can manage only one device at a time. I personally own Samsung Tab 3 (android) and iPhone 4S (iOS). To manage them, I used to use Samsung Kies and iTunes separately. So, I was searching for one specific software that would allow me to manage all my devices at a same time and found an awesome software called "MOBOROBO". I can easily manage my both iOS and android device at same time. Besides, this faciliates to manage multiple devices even more than two at same time.
In this post, I will be sharing my knowledge regarding this software how you can easily manage your device.
Managing your Android Device
At first download this software: Moborobo. It is an open source software. After the download is finished, install the software and launch it.
Here's the user interface of this software.

In the top, you can see Home, Data, Apps, Images, Music, Videos and Themes menu. In the center, you can see your connected device and list of operations you can perform.
In the top right postion, you can see some icons using which you can manage the settings of this software. You can change the language from English into other 7 different languages as shown below:

In the same icon, you can manage the setting of your device too. Click on Setting to explore more.

You can specify the locations to store the downloaded apps, wallpapers, ringtones, music, videos and themes.

Using App menu inside this setting, you can change the default installation of apps to SD card, filter the duplicated apps, and manage export setting.

Review the remaining Setting menu such as App installer, Mobo Portal and other settings yourself.
Now lets to return to 'Home' menu.
Here you can see the detail information of your connected device by clicking on the small icon 'i' as shown below:

You can also check your SD card statistics on clicking on SD Card.

The File Manager option, allow you to quickly access the files and manage them easily.

You can also backup your device Contacts, Messages, Call logs, Images, Wallpaper, Theme, Music and Apps and even Restore them whenever necessary.

When you connect android device, you will also get an option of 'Phone Cleanup'. Using this option you can easily clean the temporary files and improve the device performance.

In the bottom right, you will see some icons. By clicking on them, you can access your contacts, messages, apps, images, music and video.

Now, lets discuss about 'Data' menu.
In this section, you review your contact lists, messages and call logs.You can edit and even add contacts from this menu.

Check the remaining portion yourself. It's very simple.
Now, it's turn for 'Apps' menu.
This is the most important feature of this software. You can manage your installed apps, system apps and even search, install and updates the application on your device. It also facilates to move your installed apps from Device to SD card or vice versa. Here's the perview.

If you have internet connectivity, then you can see the trending apps, download them and install them on your device.

If you search for any application, it also provides you with some suggestions at the bottom. You can see the preview below:

While downloading the applications, you can check the status by clicking on the icon highlighted as shown below:

Now, lets discuss about 'Images' Menu. In this section you can view your device images and even download wallpapers from the store.

In 'Music' section, you can manage your ringtones and audio files. It also shows trending music which you can play and download.

In 'Videos' menu, you can view different trending videos online and can even download them.

'Themes' menu allows you to download the themes for your devices. It shows the featured themes.

Managing your iOS device
As I mentioned before, this software works smoothly with android and iOS. You can easily manage your iOS device like that of Android device.
Here's the user interface of Moborobo after you connect your iOS device.

You can view your device information as mentioned above in Android.

There's one difference. You won't get 'Phone Cleanup' option. Rest is similar. You can backup and restore your important contacts, apps, messages, images and music.


Using File manager, you can see the contents of your device, and access files of 'File Sharing Apps'.

The rest is similar Android in Data, Apps, Images, Music, Videos and Themes menu.
You can easily download and updates your apps, add and delete music files, add, edit and delete your contacts.
Note: iOS device has certain restriction in comparison to Android. You cannot apply themes. You might not easily create folders.
I mentioned earlier that you can switched between your devices. You can do as shown below:

Conclusion: Moborobo is really awesome software. Using it, you can easily manage your multiple device at the same time. It's far better than Samsung Kies and iTunes in my opinion. When I connected my Nokia Lumia 920 (Windows), it couldn't recognize it.
Was this post helpful for you? If yes, please let me know through your valuable comments below.
If you have any queries or suggestions for you, please forward them without any hesitation. We will be grateful towards you. You can also request us to write articles on any specific topics. We will be happy to serve you.
Subscribe to:
Posts (Atom)
Visitors

Popular Posts
-
 Hey friends , if you interested to learn C/C++ in you android device then CppDroid can help you. By using this app you can easily write...
 -
 In the recent times,backing up the files online is the latest way to store the personal files and folders.Files stored in cloud are more se...
 -
 Are you guys looking for PC games? As it is known to you that in today’s world 3D gaming has earned much popularity in different platfo...
 -
 At present, it's better to learn different languages so that it can be helpful for you. Besides, your mother tongue you must be much...
 -
 There are many apps that provide free calls by offering free credits. However, after the free credits are over you need to purchase the cr...
 -
 Hey Guys! Welcome to the new tutorial. In this , you will learn to create a password protected software without any software. Most of us, ...
 -
 If you own an iOS device, then you must know that by default you have to set 4 digit numeric passcode. But there is also a feature availab...
 -
 Were you ever eager to know the saved passwords in your iOS device ? Sometimes you might also want to know the passwords that your pare...
 -
 Microsoft's Windows 7 ,released on July 22,2009, was a great success and was largely accepted by its user worldwide. After few years, ...
 -
 I love the way the Windows Start Menu allow me to access the applications easily in My PC. Have you ever wish for search Start Menu for you...