


Showing posts with label PC-Tips-N-Tricks. Show all posts
Showing posts with label PC-Tips-N-Tricks. Show all posts
Wednesday, 11 February 2015

By default, the Administrator account is disabled in Windows 7 and Windows 8. Though the account you create during the setup, possess administrative rights, yet it might be necessary sometimes to perform tasks with Administrator account. There's actually no need to enable administrator account since you can execte programs that need administrative priviledges by simply right click and selecting Run as Administrator. For educational purpose it's better to learn how you can easily enable and disable Administrator account.
Process to Enable Administrator Account
Step 1: Search for Command Prompt in Start Menu. When you find it, Right click on it and select Run as Administrator.

Step 2: Type the following command and press enter.
net user administrator /active:yes

It is important that you run command prompt as administrator else you will get error as shown below:

Now you can sign out and check. You will see your Administrator account enabled.
Process to Disable Administrator Account
Step 1: Search for Command Prompt in Start Menu. When you find it, Right click on it and select Run as Administrator.
Step 2: Type the following command and press enter.
net user administrator /active:no

Hope this will be useful for you. If you have any queries please let me know.
Sunday, 1 February 2015
 Disk partitioning means the act of dividing your hard drive into multiple volumes. By doing so, you can create as many partitions as per your requirements. You can partition your drive using various 3rd party software. However, in this article I will teach you how you can effectively partition your hard drive without any software.
You don't need any advance skills. You can do it by following few easy steps mentioned below.
Process of Disk Partition
Step 1: Right Click on 'My Computer' icon and Select 'Manage' as shown below.

Step 2: Click on 'Disk Management' located at the bottom.

OR
You can also directly open Disk Management with Shortcut command.
Step 1: Open Run ( Win key + R) and
Step 2: Type 'diskmgmt.msc' and press Enter.

Step 3: Now select the volume you want to partition. I am partitioning my F: drive. Right click on it and select Shrink.

Step 4: Now enter the amount of space to shrink in MB and click on Shrink. For example: 50 Gb = 50000MB

You can see in the image below, you can see that 96 GB F: drive space has been reduced to aprrox 50GB (highlighted in Red) and the remaining space can still be used to create another partition or extend other drive space.

Process for extending your Drive
Step 1: Right click on the drive you can to extend and select 'Extend'.

Step 2: Enter the amount of space in MB that you want to extend and click on Next. You're done.

I extended my F: drive. You can see below.
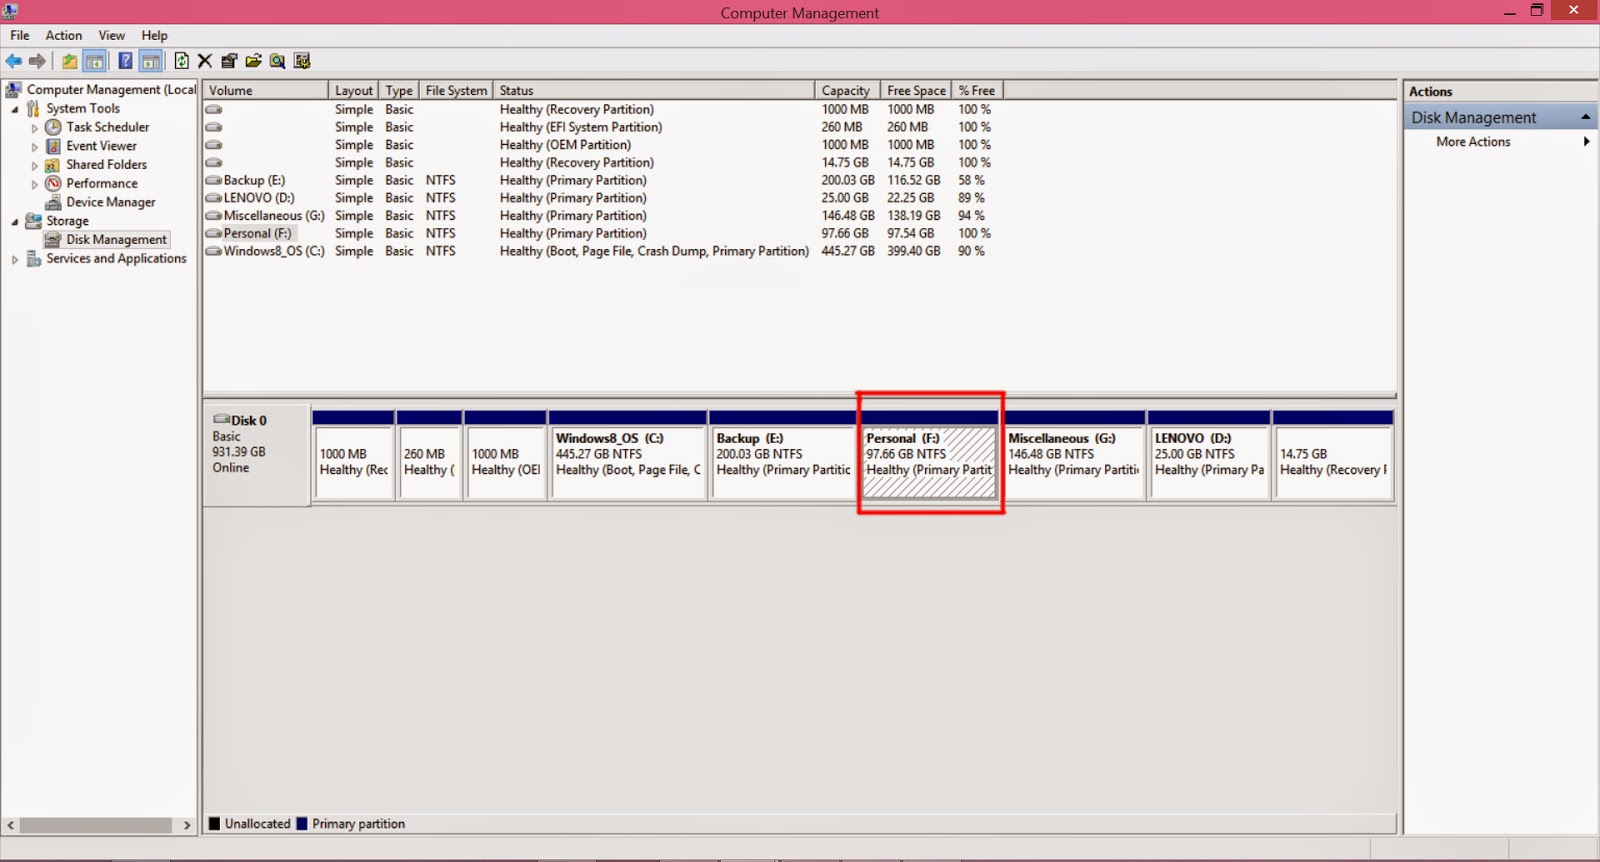
Conclusion: I performed the disk partition in Windows 8.1. You can follow the same procedures in previous version of Windows. The best thing is that you can create new partition even from drive with files and extend them in Windows 8.1 which was not possible in Window 7 and Window XP without using any software.
If you have any queries then comment below. I will be always there to solve your issues.
Friday, 19 December 2014

Sometimes, you might delete your files accidentally and want to recover that specific files as it may hold significant importance to you. Recovering your deleted files is quite simple process and for that you need to have some softwares. In this post, I will show you, how you can recover your deleted files easily. I will be showing you to recover your files using two softwares:
1. EaseUS Data Recovery Wizard 8.6 (Paid)
2. Recuva (Free)
You can recover your files using this softwares from any drives, SD cards and even USB drives.
There are many other software both free and paid to recover your files.However, I will only be discussing about those two mentioned above as I would prefer them over others.
Note: If you delete your files from your hard drives, then it will go to Recycle Bin ( unless you delete it permanently). You can easily restore your files from there. However, to recover your files from SD cards and USB drives, you still have to use recovery software.
Lets get started..
Method 1:Using EaseUS Data Recovery Wizard 8.6
Step 2: After the download is finished, launch the setup and install it. You might see Spanish language during installation. Don't worry just install it and later you can change the language.
Step 3: Now, after installation is finished, launch the application. You can change the language from Spanish to English as shown in figure below:

Step 4: Now, select the files type you can to recover and Click Next. For this tutorial, I am going to recover Graphics, Audio and Documents.

Step 5: Select the Drive from which you want to recover the files you accidentally deleted and click Next. You can only select one specific drive. I will be recovering my files from my pendrive TECHNOWING.

Now the scanning process will start as shown in figure. I must say that this software scans very fast and results are really reliable.

Step 6: After the scanning of files is finished, it will show you the lists of files you can recover. If you are not statisfied with the result, you can select Deep Scan. Here's the preview:

Step 7: Now, select the files you want to recover and click on Recover.
Remember, in trial version, you can only preview the files but cannot recover them unless you buy the license.

You can buy the premium version for $69.95 for Windows and $89.95 for Mac.

I have bought the premium version, so I will be continuing the further step.
Step 8: (I am assuming you have paid version) After you click on Recover, then you have to select the destination where you want to save your files. I saved my files in Technowing folder.

After the recovering of files is finished, a new window will appear showing you the recovered files.

Conclusion: This app user interface is really clean and easy to use. The speed of scanning the files and recovering files is very fast. Besides, it also has deep scan feature. So, if its in your budget then I would strongly recommend to go for this software.
Method 2: Using Recuva
Step 1: At first, download this free app: Recuva
Step 2: After the installation is finished, launch the software. A similar (shown below) will appear. You have to select the file type you want to Recover and click on Next. Here I will go with 'All Files' type.

Step 3: Then you have to specify the drive from which you want to recover your deleted files. There are six different options available for you. Select one option and click on Next.

I will be recovering my deleted files from my pendrive TECHNOWING.

Step 4: In next step, make sure you check 'Enable Deep Scan' for more reliable search results and click on Next. However if you want fast result, then there's no need to check that option.

Now, it will take several minutes to gather the results.

Here's the final result of Deep Scan.

Step 5: Now select the files you want to recover and click on Recover.

Step 6: Select the destination to save the recovered files.

At the end of recovery, it will show a dialog box as shown below:

Conclusion: This software is really good and provides with different options from where you can recover your files and also has Deep Scan features. This software is available for free. If you can't pay for premium recovery software then I would definately suggest you to use this software.
Was this post helpful for you? Please let me know through your valuable comments below.
If you have any queries or suggestions for us, please share them with us. If you like my posts, please share them with your friends.
Sunday, 14 December 2014
Hey Guys! Welcome to the new tutorial. In this , you will learn to create a password protected software without any software. Most of us, think that it is impossible to create such a folder but the truth is that it is very easy to do so. Read on to know how to create it.
Lets get started..
Process:
Step 1: Make a new folder (with any name as your wish).
Inside that folder make a Text file( with .txt extension ) & copy inside it copy the entire code given below:
Quote:
Quote: cls
@ECHO OFF
title Folder Private
if EXIST "Control Panel.{21EC2020-3AEA-1069-A2DD-08002B30309D}" goto UNLOCK
if NOT EXIST Private goto MDLOCKER
:CONFIRM
echo Are you sure you want to lock the folder(Y/N)
set/p "cho=>"
if %cho%==Y goto LOCK
if %cho%==y goto LOCK
if %cho%==n goto END
if %cho%==N goto END
echo Invalid choice.
goto CONFIRM
:LOCK
ren Private "Control Panel.{21EC2020-3AEA-1069-A2DD-08002B30309D}"
attrib +h +s "Control Panel.{21EC2020-3AEA-1069-A2DD-08002B30309D}"
echo Folder locked
goto End
:UNLOCK
echo Enter password to unlock folder
set/p "pass=>"
if NOT %pass%== password here goto FAIL
attrib -h -s "Control Panel.{21EC2020-3AEA-1069-A2DD-08002B30309D}"
ren "Control Panel.{21EC2020-3AEA-1069-A2DD-08002B30309D}" Private
echo Folder Unlocked successfully
goto End
:FAIL
echo Invalid password
goto end
:MDLOCKER
md Private
echo Private created successfully
goto End
:End
After you have copied the above code into text file, go to line 23 and keep the desired password instead of that bold word (i.e. password here).

For example: if NOT %pass%== technowing goto FAIL
/* In this case your password becomes = technowing */
Step 2: After that, click on File > Save As and name it as 'locker.bat'.
This is our locker file. Remember the file extension should be '.bat' . Make sure you have selected "All Files" in 'Save as type'.

Now close the text file and return into the folder that you had created earlier. You can see a batch file named locker.

Step 3: Click on it. It will prompt you to enter a password. After you enter password, a folder name Private will appear.


This is the secret folder where you can keep your important data and files. Now save all your important files in this Private folder.
Step 4: After that when you need to lock that folder, again click on that locker.bat file. It will prompt you to ask whether you want to lock or not.
Now enter 'y' or 'Y' the folder will be locked and invisible.

If you again want to gain access to that folder click on that locker.bat file and type the password. Again to lock the folder same as previous can be done.
In case if delete the locker.bat file, then you can again create a new file as created above but remember that the password should be same.In order to avoid such circumstances, you can save locker.bat in several locations for future reference.
Note: If you forget the password, you can still check it by: Right Click and Select Edit Option.

I hope you like this article..If you have any suggestions or queries then please forward it to us through comments.
Subscribe to:
Posts (Atom)
Visitors

Popular Posts
-
 Hey friends , if you interested to learn C/C++ in you android device then CppDroid can help you. By using this app you can easily write...
-
 In the recent times,backing up the files online is the latest way to store the personal files and folders.Files stored in cloud are more se...
-
 Are you guys looking for PC games? As it is known to you that in today’s world 3D gaming has earned much popularity in different platfo...
-
 At present, it's better to learn different languages so that it can be helpful for you. Besides, your mother tongue you must be much...
-
 There are many apps that provide free calls by offering free credits. However, after the free credits are over you need to purchase the cr...
-
 Hey Guys! Welcome to the new tutorial. In this , you will learn to create a password protected software without any software. Most of us, ...
-
 If you own an iOS device, then you must know that by default you have to set 4 digit numeric passcode. But there is also a feature availab...
-
 Were you ever eager to know the saved passwords in your iOS device ? Sometimes you might also want to know the passwords that your pare...
-
 Microsoft's Windows 7 ,released on July 22,2009, was a great success and was largely accepted by its user worldwide. After few years, ...
-
 I love the way the Windows Start Menu allow me to access the applications easily in My PC. Have you ever wish for search Start Menu for you...